

The image above and video to the right are examples showing how Jetpack Holiday Snow looks
(Our site uses WP Snow Effect plugin instead)
Jetpack Holiday Snow is a feature that is included in the WordPress Jetpack plugin by Automattic. When enabled it adds a snow falling effect to your website between Dec. 1st and Jan. 4th of each year. By default the feature is disabled in Jetpack settings.
In this guide I will show you how to install and enable the Jetpack Holiday Snow feature, how to configure some advanced options.
How to Install Jetpack
To add falling snow to your website you first you need to have Jetpack installed. If you don’t have Jetpack, don’t worry it’s free and easy to install. From the WordPress admin area go to Plugins > Add New. Search for Jetpack, click install, then activate. You will need to connect it to your WordPress.com account. If you don’t have one it will guide you through the processes of setting one up.
How to Enable Holiday Snow
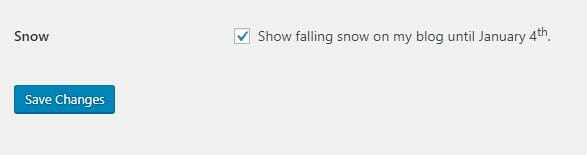 Once Jetpack is installed, enabled, and connected to WordPress.com, it’s time to enable Snow. If the date is between December 1st and January 4th, then the option below will be available.
- From the WordPress admin area go to Settings > General
- Scroll down to the bottom and click the button next to ‘Snow’ to enable it.
- If the Snow option is not available to you, you can adjust the dates for Snow Option below.
How to Enable the Snow Option, and adjust the Snow Dates
- From t
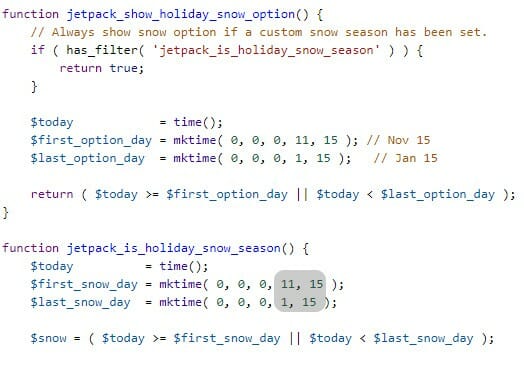 he WordPress Admin area go to Plugins > Editor.
 - Where it says “Select plugin to edit”, choose: “Jetpack by WordPress.com”.
- Under “Plugin Files” click Modules > holiday-snow.php
- To make the snow options available in General Settings: Adjust the dates next to $first_options_day, and $last_options_day. The first number after the three zeros is the month, the second number is the day. In the image I have it set to snow option in general settings between Nov. 15th and Jan. 15th.
- To adjust the dates snow will appear on the website: scroll down and edit the dates next to $first_snow_day, and $last_snow_day. The first number after the three zeros is the month, the second number is the day. In the image I have it set to snow between Nov. 15th and Jan. 15th.
* If you update the Jetpack Plugin after making these changes the snow dates will revert back to the default (Dec. 1 – Jan 4).
How to Adjust the Jetpack Snow Options
- From the WordPress Admin area go to Plugins > Editor.
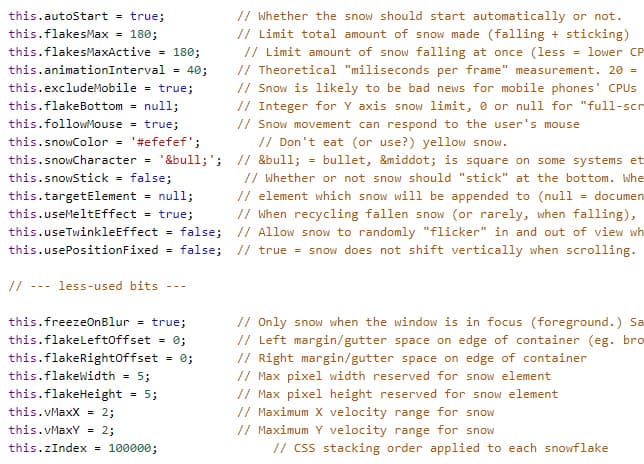 Where it says “Select plugin to edit”, choose: “Jetpack by WordPress.com”.
- Under “Plugin Files” click Modules > holiday-snow > snowstorm.js
Make snowflakes larger or smaller
this.flakeWidth = 5;
this.flakeHeight = 5;
Increase or decrease number of flakes
this.flakesMax = 180;
this.flakesMaxActive = 180;
make the snow follow or ignore mouse movements
this.followMouse = true;
Sometimes this option results in snow gathering on the edges of the screen, so might want to disable it.
Change the snow color
this.snowColor = ‘#ffffff’;
If you have a white background on your website you might want to use an off white color like #efefef or #eeeeee
Adjust Snowflake Speed
this.vMaxX = 2;
this.vMaxY = 2;
To increase snow speed use a number above 2. For a snow that falls slower use a number below 2, such as 1.5.
* If you update the Jetpack Plugin after making these changes the options will revert back to default.
Jetpack Holiday Snow Opt-In
Only show snow if a user clicks the button to opt-in. Users can also disable the snow if they get tired of it by clicking the button again. The snow is disabled by default, and the snow status is stored in a cookie so it will remain on or off.
If you have any questions about Jetpack Holiday Snow leave a comment below.


